Wood Visual Checklist: Common Clues, Lookalikes, and Next Steps
Practical wood visual clues you can check at a glance, plus common lookalikes and safe next steps to verify matches before trusting a single photo.
Quick answer for wood visual clues
Wood visual clues are the small, observable features in a piece of wood—grain pattern, pore arrangement, color, growth rings, and surface figure—that give immediate, testable hints about species or category. Checking these clues in the photo you have is the fastest way to narrow possibilities before investing time in detailed testing.
Good first-pass checks include the overall grain direction (straight, wavy, interlocked), visible pores or rays on the surface, contrast between earlywood and latewood, and whether the piece shows sapwood versus heartwood. Each of these clues can often rule in or out broad groups (hardwood vs. softwood, ring-porous vs. diffuse-porous) even when a single image can’t prove a final ID.
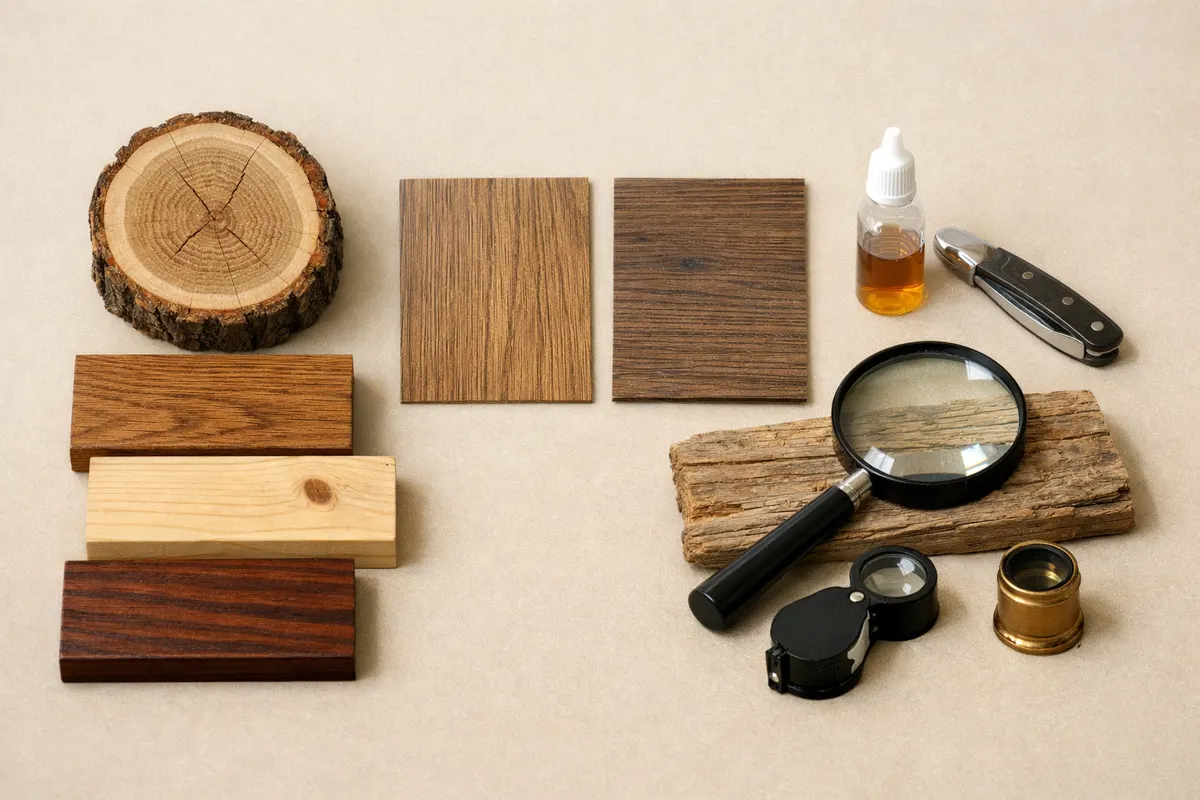
Use the checklist below to score how informative your photo is, note potential lookalikes, and pick the most useful next steps—such as taking additional photos (scale + end grain), checking context (source, age, finish), or running a targeted app check with Wood Identifier - Wudora as a research aid.
What it means
When people search for wood visual clues they want quick, reliable pointers they can see without cutting or chemical tests. Visual clues are descriptive features: pore size and distribution, visible rays, color shifts, medullary rays, distinct sapwood bands, figuring like flame or fiddleback, and tool marks or finish that affect appearance.
These clues serve two purposes: they narrow the candidate list and they guide which additional checks will be most informative. For example, seeing large, open pores in distinct vertical lines suggests a ring-porous hardwood (oak, ash) while very fine, indistinct pores point toward diffuse-porous species (maple, birch) or some softwoods.
Because finishes, stains, and aging can mask natural color and subtle grain, visual clues are often strongest on raw, unfinished end grain or lightly sanded surfaces. Context—where the wood came from, how old the object is, and how it was worked—also changes which species are likely and therefore which visual clues matter most.
Key clues
Use the following visible features to form a prioritized checklist. Each clue has a reliability tier: high-confidence (rarely ambiguous), useful (helps narrow groups), and watch-for (easy to misread).
When possible photograph or examine the end grain and a long-grain face. End grain often reveals pore arrangement, ray prominence, and growth-ring contrast more clearly than a finished face.
Pay attention to scale: include a coin or ruler because pore size and ray width are only meaningful when you know their actual dimensions.
- Grain pattern (high-confidence): straight, wavy, interlocked, or spiraled; interlocked grain often shows a ribbon effect on quartersawn surfaces.
- Pore arrangement (high-confidence): ring-porous (large pores in earlywood bands) vs. diffuse-porous (pores evenly distributed). Oak and ash show ring-porous patterns; maple and birch are diffuse.
- Rays and figure (useful): visible medullary rays (wide rays show in oak) and figuring like curl, quilt, or fiddleback help separate species with similar color.
- Growth-ring contrast (useful): strong contrast between earlywood and latewood points to species with distinct seasons of growth, common in temperate hardwoods.
- Color and sapwood banding (watch-for): heartwood color can be misleading when stained or aged; sapwood lighter bands are useful when visible and untreated.
- Texture (watch-for): coarse texture vs. fine texture—pore size and wood feel—helps separate woods with similar grain but different pore scale.
- Resin canals and knots (special clues): presence of resin canals suggests some softwoods (e. g. , pine), and specific knot patterns can identify lumber cut orientation and species in some cases.
- Surface finish and tool marks (context): varnish, stain, or planing can hide or emphasize features; sanding back a small area or comparing an unfinished end grain improves accuracy.
Step-by-step workflow
Treat wood visual clues as a deliberate workflow: observe, document, compare, then verify. This reduces mistakes caused by one-off impressions and helps you build confident, evidence-based matches.
Work from the least invasive checks to more involved ones. Start with photos and notes, then move to targeted physical checks (end-grain view, smell if appropriate, feel for hardness) only when the initial clues leave you uncertain.
Keep a log for each candidate identification: which clues you saw, which lookalikes you considered, and what verification steps you still need. That log becomes valuable if you later consult an expert or use an identification app as a second opinion.
- Step 1 — Photograph for scale and context: take one face shot with a ruler or coin, one end-grain close-up, and one long-grain shot that shows the entire board or feature.
- Step 2 — Check high-confidence clues first: pore arrangement, obvious rays, and grain direction; rule out major groups (oak vs. maple vs. pine) early.
- Step 3 — Compare with lookalikes: list two or three species that match the strongest clues and note which secondary clues would separate them (e. g. , ray size, scent, or weight).
- Step 4 — Take targeted verifications: remove a small finish patch to reveal raw wood, sand an end grain for clearer pores, or weigh a small sample to estimate density if safe to do so.
- Step 5 — Use digital tools as research aids: feed the same photos and context notes into a reputable app and treat the app’s suggestions as leads, not final proof.
- Step 6 — Escalate when necessary: for furniture valuation, structural use, or safety-relevant determinations, consult a local expert, lab test, or lumber seller rather than relying on photos alone.
Examples
Example 1 — A floorboard with large, vertical pores and visible rays: The clear ring-porous pattern, wide rays on quartered cuts, and coarse texture point strongly at oak. If the color is dark but the pore pattern is obvious on the end grain, oak is more likely than walnut or mahogany, which have different pore and ray structures.
Example 2 — A light-colored panel with very tight, uniform grain and no visible pores on a face photo: That description fits maple or birch. A close end-grain shot showing very small, uniformly distributed pores supports maple; a visible flame figure or wider rays would push toward other species.
Example 3 — A reddish-brown tabletop with strong ribbon grain on quartersawn surfaces: Ribbon or lace-like patterns often come from interlocked-grain species such as sapele or some mahoganies. Look for specific rays and pore size in the end grain to separate sapele from true mahogany.
- When a photo shows finish wear down to raw wood at an edge, prioritize that area for clues—the raw edge gives a truer color and pore view.
- If the object is a reclaimed beam with heavy exposure, expect patina and oxidation to darken heartwood; rely more on pore structure and rays than on color alone.
- For small objects (turnings, tools), scale matters: small piece photos can make pores appear larger than they are, so always include a scale reference.
Limitations
A single photo rarely proves species-level identification. Visual clues can strongly suggest a group or narrow the candidate list, but finishes, stains, lighting, and wear introduce ambiguity. Treat any single-photo match as provisional until you check end grain, scale, and context.
Some species are notorious lookalikes. For instance, stained birch can resemble maple in color; sapele and mahogany can appear similar on a finished face; and certain tropical hardwoods mimic domestic species. That’s why assessing multiple clues and using targeted verification steps matters.
There are also safety and value limits: identification from a photo should not be used alone to decide whether wood is safe for food contact, load-bearing construction, or to set a market appraisal. Those decisions require physical inspection, provenance, and sometimes lab testing.
- High-confidence outcomes: when multiple high-confidence clues agree (pore pattern, ray presence, grain type) you can be reasonably certain about a genus-level match.
- Partial confidence: if only one or two useful clues match, keep the result as a shortlist and prioritize additional checks (end grain, context).
- Uncertain outcomes: if clues conflict or most clues are masked by finish, mark the sample as uncertain and avoid making safety, value, or legal claims based on the photo alone.
- When to consult an expert: for antique furniture valuation, structural timber use, or identification of rare/tropical species, seek a trained wood anatomist, experienced luthier, or accredited lab.
Next step: use Wood Identifier - Wudora as a research aid
After you’ve checked the visible clues and taken photos with scale and end-grain views, try Wood Identifier - Wudora on iOS to compare your images against reference examples. Treat the app’s suggestions as research leads—record what matched, note any uncertainties, and verify important or high-risk uses with an expert inspection.
Frequently asked questions
How many photos do I need to identify wood reliably?
At least three: a face shot with a scale reference, a close-up of the end grain, and a long-grain view that shows the entire board or object. These three perspectives capture pore pattern, ray visibility, grain direction, and overall figure—together they give the best chance of narrowing to a small set of candidates.
Can color alone identify wood?
No. Color is influenced by species but also by finish, age, and exposure. Use color as a supporting clue alongside pore arrangement, grain pattern, and end-grain features. When color conflicts with structural clues, prioritize pore and ray evidence.
What are common lookalikes I should watch for?
Some frequent confusions include stained birch vs. maple, sapele vs. mahogany, and oak vs. ash on finished surfaces. Pay special attention to pore size and ray presence to separate these lookalikes—end grain photos are particularly useful for those comparisons.
Is an app enough to confirm the wood type?
Apps are useful research aids and can quickly suggest candidates from photos, but they should be treated as one piece of evidence. Combine app suggestions with your visual-checklist findings, additional photos, and, when necessary, hands-on inspection or professional verification.