Wood Identification by Grain: Color, Pores, End Grain, and Next Checks
Use grain, color, pores, rays, end-grain photos, and project context to narrow wood species before scanning images with Wudora for next checks.
Quick answer for wood identification by grain
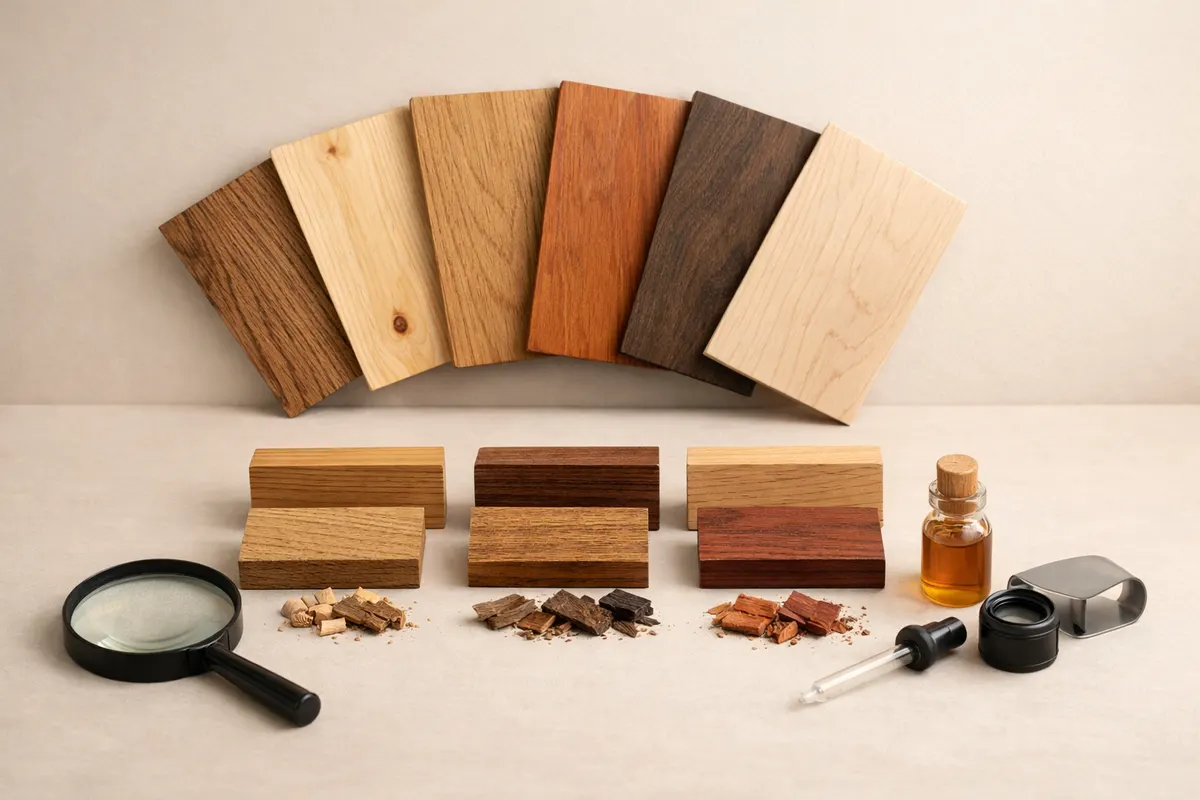
Wood identification by grain starts with the visible anatomy of the board or object: grain direction, pore pattern, medullary rays, color, end-grain, and how finish or age may be masking the surface. A clear photo can usually narrow the material to a short list such as oak-like, walnut-like, maple-like, pine-like, or mahogany-like.
A practical first pass is to note three quick markers: overall color and tone, the grain pattern (straight, wavy, interlocked), and whether the surface shows pores (open-pored like oak) or closed pores (like maple). Use these clues to spot likely lookalikes and decide which next checks matter most.
If you want a faster way to iterate through candidate matches after you’ve checked visible clues, use Wood Identifier - Wudora to scan photos and return candidate matches as research notes. Treat these results as hypotheses to confirm with additional context, such as smell, weight, end-grain, provenance, or expert review.
- Start by separating hardwoods vs softwoods using pore visibility and grain.
- Look for characteristic patterns (medullary rays, ring-porous bands) to spot oaks, ash, or walnut.
- Use a photo-scanning app for candidate matches, but verify uncertain results with more clues or an expert.
What it means
When people search for wood identification by grain, they usually want to know what species or trade category a piece of timber belongs to — for example, whether a tabletop is oak, a chair leg is beech, or a board is pine. Practically speaking, the result may be a broad category, a common trade name, or a species-level candidate.
Identifying wood visually is about pattern recognition and context. Color and grain give immediate clues, but surface finish, staining, and age can disguise them. End-grain (the cut surface showing rings and pores) gives stronger anatomical evidence than a finished face, because it reveals pore size, shape, and arrangement.
A realistic result from an image-based search is a narrowed list of candidate woods and a recommended next-check list. For many home and craft uses, that level of confidence is enough to choose finishes, match repairs, or understand likely hardness and workability. For appraisal, safety, protected species, or conservation work, visual ID from photos should be treated as preliminary.
This guide teaches the visible clues to scan for, common lookalikes to watch out for, a step-by-step workflow you can follow with your photos, and what to do when a match is uncertain.
- Grain and pores narrow the shortlist; end-grain makes the shortlist stronger.
- Finish, stain, age, and veneer can hide the natural surface.
Key clues
Use these clues in order of reliability for photo-based work: end-grain features and pore patterns are most diagnostic (when visible), followed by grain figure and medullary rays, then color and sapwood contrast. Contextual clues such as location, vintage of the object, and typical uses narrow the field further.
Below are focused visual checks that translate well from a phone photo to a shortlist of candidate woods. Take multiple photos (face, end-grain, close-up of pores, and an object-scale shot) to make these clues usable.
- Color and tone: note whether the piece is pale (maple, birch), medium brown (walnut, cherry aged), or reddish (mahogany, cherry fresh). Remember finishes can mask natural color.
- Grain direction: straight and uniform often points to species like pine or poplar; wavy, curly or fiddleback suggests figured maple, mahogany, or walnut variants.
- Pore pattern (ring-porous vs diffuse-porous): ring-porous woods (white oak, ash) show large earlywood pores in distinct rings; diffuse-porous woods (maple, birch) have more uniform pore distribution.
- Medullary rays: visible light streaks across the grain on quarter-sawn faces indicate oak (very prominent) or sycamore; rays are diagnostic for species like oak and some elms.
- End-grain detail: look at pore size, arrangement, and the presence of rays. End-grain photos let you distinguish oak from elm and ash from hickory more reliably.
- Figure and chatoyancy: curly, quilted, or tiger stripe figuring often points to maple or mahogany; look for repetition and symmetry in figure patterns.
- Knots and resin canals: many softwoods (pine, fir) show resin canals and prominent knots; presence and size of knots help separate construction lumber from furniture-grade hardwoods.
- Sapwood vs heartwood contrast: strong contrast (pale band near the bark) can indicate species like walnut (dark heartwood, pale sapwood) or cherry (reddish heartwood developing over time).
- Density cues (in photos only): visible crushing, denting, and screw bite can hint at softer woods like pine; very tight, fine pores usually denote harder species.
- Finish and patina: original finishes can change apparent color and hide pores. When possible, inspect an unfinished edge or sand a tiny patch for clearer clues.
- Tool marks and joinery style (context): older joinery and tool marks suggest period furniture woods common at that time (e. g. , oak in older English pieces, walnut in mid-19th-century American pieces).
- Contextual provenance: region and purpose narrow common species (for example, teak and rosewood are typical in outdoor or high-end inlay work; local pines and spruce dominate construction lumber).
Step-by-step workflow
Follow a consistent workflow when using photos for wood identification by grain. This reduces bias and turns your observations into a reproducible checklist you can compare against reference images or an identification app. Below is a prioritized sequence from easiest visual checks to more confirmatory steps.
Take good reference photos first: a wide shot for context, a close-up of the face, and a well-lit end-grain image. If you can’t get an end-grain, aim for a high-resolution macro of a raw edge or an unfinished seam.
As you work through the steps, write short notes (color, pore pattern, likely hardness) rather than declaring final species names. Use these notes with a photo-scanning tool such as Wood Identifier - Wudora to get candidate matches, and then verify the top candidates with the confirmatory checks below.
- 1) Photograph: take four photos — context/scale, full-face, close-up of grain, and end-grain (or raw edge). Include a ruler or coin for scale in at least one shot.
- 2) Initial sort: is it hardwood or softwood? Look for visible pores and grain complexity. Absence of visible pores usually leans toward softwood or closed-pore hardwoods (like maple).
- 3) Note color and tone: is the color uniform or streaked? Record if the piece looks oxidized (reddish over time) or artificially stained.
- 4) Look for ring-porous vs diffuse-porous: distinct earlywood pores = ring-porous (oak, ash), even distribution = diffuse-porous (maple, birch).
- 5) Inspect end-grain: count pore rows, note pore size, and look for medullary rays — document these with another close-up photo.
- 6) Match common lookalikes: compare the notes to shortlists (oak-like: pronounced rays and ring porosity; walnut-like: dark heartwood and straight open grain; maple-like: pale, tight closed pores and occasional figure).
- 7) Use a scanning app: run your photos through Wood Identifier - Wudora for candidate types. Treat the app output as research notes, not final confirmation.
- 8) Do quick physical checks if possible: a scratch test for hardness (light and controlled), smell the wood (fresh-cut smell can be distinctive for cedar, teak), and weigh a small sample for relative density clues.
- 9) Cross-check provenance and use: if the piece is outdoor decking in a tropical climate, teak becomes more probable; furniture labeled “antique English” raises oak as a likely candidate.
- 10) Decide verification level: for casual use (matching a finish) your shortlist may be enough; for sale, conservation, or safety, arrange an expert appraisal or lab analysis (microscopy or DNA) as needed.
Examples
Example 1 — Dining table top (one photo of finished face): A medium-brown tabletop with prominent rays and a ring-porous look on close-up often points to white oak. If the photo shows quarter-sawn rays and a slightly coarse texture, list white oak as your top candidate and note: ring-porous, prominent rays, medium tone. Next check: an end-grain shot to confirm pores and rays.
Example 2 — Chair leg (worn finish, small chip exposing raw edge): If the chip reveals a pale sapwood with tight, even pores and a generally straight grain, maple or birch are likely. The presence of curly figure on another face would push maple higher. Next checks: measure density by weight and take a close end-grain photo if possible.
Example 3 — Pine construction board (visible knots and resin pockets): Wide, cathedral grain, frequent knots, and pale yellow color almost always indicate softwoods like pine or spruce. These are typical of construction lumber and are easy to separate from hardwood furniture species. Next checks: look at growth ring spacing on end-grain to confirm softwood.
Example 4 — Small inlay or veneer (high gloss, repeated pattern): Veneer patterns can mimic more expensive timber. If the face shows repeating identical figures across pieces, treat the material as a veneer. Look at edges and backs for substrate material; a thin decorative layer glued to a different core is a giveaway.
- Oak-like matches need ray and ring-pore checks, not color alone.
- Veneer and stained surfaces need edge or underside photos before trusting the match.
Limitations
Visual identification from a single photo is inherently limited. Factors such as finish, staining, lighting, age-related patina, and photographic compression can alter or hide the diagnostic features used to tell wood species apart. Because of this, any single-photo identification should be considered a starting hypothesis.
Separate results into three outcome bands: high-confidence (distinctive features clearly visible, e. g. , quarter-sawn oak rays + ring porosity), partial confidence (several supporting clues but no end-grain), and uncertain (finish hides pores, poor photo quality, or the wood is a common lookalike group). Be explicit about which band applies to your case.
When identification affects safety, monetary value, provenance, or conservation decisions, do not rely solely on photos or app results. A lab-level confirmation (microscopy, wood anatomy analysis, or, in rare cases, DNA) or an on-site expert evaluation is appropriate for these stakes.
Practical verification steps: obtain an end-grain sample or clear unfinished edge, compare to reference samples under consistent light, and consult specialists for high-value or legally sensitive items (protected woods, antique furniture). Treat app outputs and visual IDs as research notes that guide these next actions rather than final answers.
- High-confidence ID requires clear end-grain or very diagnostic figure.
- Partial confidence is common; use physical checks to raise certainty.
- Uncertain IDs should be labelled as such and verified by experts before acting on value or legal claims.
Related guides
Next step — scan your photos with Wood Identifier - Wudora
After you’ve checked grain, pores, rays, color, context, and end-grain, use Wood Identifier - Wudora on your phone to generate a shortlist of candidate woods. Treat the app results as research notes: use them to plan follow-up checks rather than as final confirmation.
Frequently asked questions
How reliable is wood identification by grain from photos?
Visual ID from good photos can narrow possibilities well but rarely proves an exact species. Photos are useful to separate broad groups (oak-like, maple-like, pine-like) and to create a shortlist. For high-stakes uses (appraisal, conservation, legal compliance), follow up with end-grain examination, physical tests, or expert/lab verification.
What photos should I take to improve identification?
Take a context shot with scale, a full-face shot under even light, a macro close-up of grain and pores, and an end-grain or raw-edge image. Include a ruler or coin for scale and avoid heavy shadows or color casts. If possible, photograph an unfinished edge to bypass surface finishes.
Can an app tell me the exact species from my phone photo?
Apps can suggest candidate woods and help prioritize likely matches, but they should be treated as research tools. The app’s result is a hypothesis based on visual patterns; confirm with additional clues (end-grain, density, smell) or expert examination before making decisions based on that identification.
How do I tell lookalikes apart (for example, oak vs ash or walnut vs mahogany)?
Focus on pore arrangement and medullary rays: oak shows very prominent rays on quarter-sawn faces and ring-porous structure; ash tends to have large pores but weaker rays. Walnut commonly has darker heartwood and a straight to wavy grain, while mahogany often displays interlocked grain and a reddish tone. End-grain and ray visibility are decisive for many lookalike pairs.