Plywood vs Solid Wood: Edges, Layers, Grain, and Weight
Plywood vs solid wood: learn the visible clues—edges, layers, grain continuity, and weight—that photos can show, plus safe checks before relying on a match.
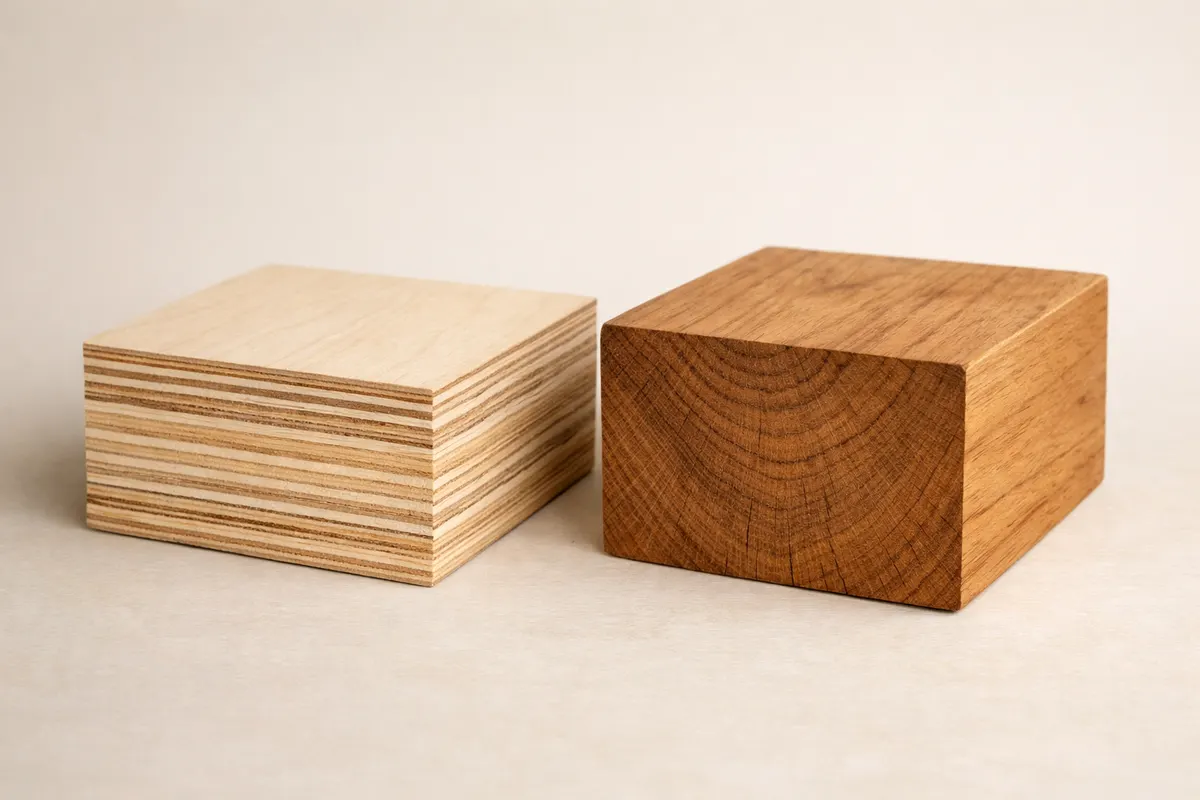
Quick answer: how to tell plywood vs solid wood fast
Plywood vs solid wood can often be separated by a few visible clues in photos: plywood normally shows layered edges and a repeating veneer pattern, while solid wood has continuous grain through the thickness and a single-piece end grain. If your photo clearly reveals an edge or end grain, that clue alone can give strong initial confidence.
Edges are the fastest visual cue. A clean cross-section that shows alternating light and dark layers, glue lines, or repeating veneers is almost always plywood. Conversely, an uninterrupted grain pattern and a single, consistent color and pore structure from face to edge indicate a solid board.
Weight and thickness give supporting evidence but rarely settle the question from one photo: plywood tends to be lighter for the same panel size and often uses thin face veneers on cheaper panels, while solid wood will feel denser and show full-width rings or rays on the end grain if visible.
Treat any single photo as a hypothesis, not a verdict. Use these visible clues to prioritize follow-up checks — look for an end-grain close-up, a clear edge shot at 90 degrees, or photos of hardware and fasteners that reveal construction methods before you act on the identification.
- Layered, repeating lines at the edge = plywood in most cases.
- Continuous grain from face to edge = likely solid wood.
- Thin surface pattern repeating across panels often means a veneer.
- End grain with rays or clear growth rings supports solid wood ID.
- If the photo is ambiguous, gather scale and context shots before deciding.
At-a-glance comparison of plywood vs solid wood clues
The table below summarizes the visible clues, typical confidence level from a photo, and practical next steps you can take when you encounter each sign. Use the table as a checklist while photographing the object: an edge shot, a macro of the end grain, and a full-surface image will cover most of the entries.
Photos rarely capture density directly, so the “weight” row focuses on what to photograph to infer weight (thickness, panel size, or hardware spacing). Confidence scores here reflect a typical photo situation; physical testing or more angles will raise certainty.
After scanning the table, follow the suggested next steps in the verification section to avoid costly mistakes when the choice between plywood vs solid wood affects value, performance, or safety.
| Clue to check | Plywood (what to expect) | Solid wood (what to expect) | Confidence from a photo / Next step |
|---|---|---|---|
| Edge cross-section | Alternating veneers, glue lines, repeating thin layers | Single continuous grain, same color through thickness | High if clear; follow with close-up of edge and 90° shot |
| Face-to-edge grain | Pattern may stop at veneer edge or repeat unnaturally | Grain continues smoothly from face to edge | High when visible; low if only surface visible — check end grain |
| End grain | Usually covered by veneer; may show plywood core with layers | Shows rays, pores, continuous growth rings | Very high if macro end-grain photo provided |
| Weight and stiffness | Lighter for same panel size; flexes more in thin plywood | Denser and stiffer; heavier in same dimensions | Medium from photo; measure thickness and compare with known boards |
| Surface match (repeating figure) | Repeating figure or mirrored seams from veneer matching | Natural, non-repeating figure and irregular patterns | Medium; take several surface shots to spot repeats |
| Fasteners and construction | Staples, thin screws, or concealed joining; often used in plywood construction | Full-length screws, through-tenons, solid joinery visible | Medium; photograph inside/back panels and joints |
- Use an edge shot at 90° to reveal layers and veneers.
- Photograph end grain with a macro lens or phone close-up to see rays and pores.
- Include a ruler or coin for scale; small veneers can mislead without scale.
- Capture underside or interior edges (cabinet backs, drawer bottoms) where plywood is often exposed.
When plywood vs solid wood makes the most sense
Choosing plywood or solid wood depends on function, budget, appearance, and the project’s durability requirements. Plywood is popular for large flat surfaces (cabinet boxes, shelving, subfloors) because it resists warping and is economical in larger panels. Solid wood is preferred for visible trim, furniture faces, and heirloom pieces where full-depth grain and refinishing capability matter.
If you’re deciding from photos whether a piece is plywood or solid wood for refinish planning, think about how the surface will respond to sanding and staining. Veneered plywood can only be lightly sanded before the thin face layer is lost; solid wood accepts deeper sanding and repairs. When the photo shows a thin veneer or repeating pattern, plan for veneer-safe finishing methods.
For structural decisions — shelving load, stair treads, or table tops — the identification matters. Photos that suggest plywood may still be fine structurally if it’s thick exterior-grade plywood or multi-ply Baltic birch, but thin interior-grade paneling photographed on a span should raise a red flag. Conversely, photos suggesting solid wood should prompt checks for rot, internal cracks, or hidden lamination.
When the item’s value or restoration approach depends on material (antique furniture, custom joinery), use visible clues to form a hypothesis, then apply the verification path below. If you need professional-level certainty from photos, collect the set of images described in the verification section and treat the app as a research tool rather than an absolute inspector.
- Use plywood for large, flat, concealed surfaces and where dimensional stability matters.
- Choose solid wood for refinishing, visible edges, and when grain continuity is important.
- If photos show veneer patterns or repeating motifs, assume veneer until proven otherwise.
- For load-bearing applications spotted in photos, verify thickness and ply count before relying on the match.
Common confusions when identifying plywood vs solid wood
Veneers and laminated furniture tops are the source of most misidentifications. A high-quality veneer can mimic solid wood grain so well that surface photos look convincing. Look for repetition in the figure across panels or a sudden change at the edge to spot a veneer. Also, bookmatched veneers can create symmetrical patterns that rarely occur across a single solid plank.
Another trap is painted or finished edges. Thick paint, filler, or edge banding can hide the layered structure of plywood. Photos that only show a painted face can be misleading; get a picture of an exposed cut, underside, or back edge where coverings are absent to reveal true construction.
Engineered products complicate simple labels. MDF with a wood veneer, particleboard with a hardwood face, and multi-layer laminated boards sit between plywood and solid wood in appearance and performance. From a photo, these materials often require context clues — visible screw patterns, factory edge banding, or manufacturing labels — to tell them apart.
Finally, reclaimed or repaired furniture introduces mixed materials: a solid wood top may be attached to a plywood box, or a veneer patch may cover a rot repair. When photos show inconsistent clues (solid-looking face but layered edge in a different area), assume a composite construction and verify which part matters for your decision — the surface, the structure, or the joinery.
- Veneer patterns can be convincing; check for repeating grain across panels.
- Paint, filler, or edge banding commonly conceal true edges — photograph exposed cuts.
- Engineered and laminated boards blur the line between plywood vs solid wood.
- Repaired or mixed-material pieces require targeted photos of each component.
Verification path
Start by collecting a consistent photo set: (1) a straight-on full-surface shot to show figure and matching, (2) a 90° edge cross-section that reveals layers or continuous grain, (3) a macro end-grain shot (or as close as possible), and (4) pictures of joints, fasteners, and underside or interior panels. Each image addresses a different common ambiguity when distinguishing plywood vs solid wood.
When you have those photos, apply a short checklist: look for repeating veneer patterns across panels, check that grain flows uninterrupted to the edge, verify the presence or absence of glue lines in the cross-section, and inspect fasteners and joinery for factory versus traditional construction methods. If photos contradict each other — for example, a solid-looking face but a layered edge — prioritize the edge and end-grain photos for material decisions.
If the choice affects safety, cost, or restoration approach, add simple physical checks if possible: a light tap to sense relative density, a measurement of panel thickness versus span, and a careful inspection under a magnifier for pores and rays. These physical checks are easy to report in a follow-up photo or note and dramatically increase identification confidence beyond what a single image provides.
Use digital tools as research aids, not final appraisals. If you use the Wood Identifier - Wudora app after collecting the recommended photos, treat any result as a probability-weighted suggestion. Document your photos and notes so an expert — a luthier, cabinetmaker, or restoration professional — can review them if the material choice carries high stakes.
- Gather four photos: surface, 90° edge, end grain close-up, and joints/underside.
- Check for repeating veneer patterns and glue lines at the edge.
- Measure thickness and compare with expected ply counts for load-bearing parts.
- If unsure, note ambiguous areas and consult a professional with your photo set.
Related guides
Try Wood Identifier - Wudora after collecting clear photos
After you’ve gathered edge, end-grain, surface, and underside photos, use Wood Identifier - Wudora as a research step to surface likely matches and note areas of uncertainty. Treat app results as informed suggestions — combine them with the verification steps above and, for high-stakes or ambiguous cases, share your photo set with a restoration or woodworking professional before you commit.

Frequently asked questions
Can I reliably tell plywood vs solid wood from one smartphone photo?
A single smartphone photo can provide strong evidence if it clearly shows an edge or end grain: an exposed cross-section showing repeated thin layers is strongly indicative of plywood, while continuous grain and visible rays or ring structure point to solid wood. However, many finishes, veneers, and engineered products disguise those clues. For reliable identification, capture at least an edge cross-section, a macro end-grain shot, and a full-surface image with scale; then treat the result as a well-informed hypothesis rather than an absolute verdict.
What photo angles are most useful when distinguishing plywood vs solid wood?
The most useful angles are a straight-on surface shot to reveal figure and repeats, a 90° edge cross-section to show layers or continuous grain, and a close-up of the end grain to reveal pores, rays, or ring patterns. Include a photo of joints or the underside to spot factory edges, staples, or edge banding. Add a ruler or coin for scale and a good light source to reduce misleading shadows.
How do veneers and laminates confuse visual identification?
Veneers and laminates often mimic solid wood grain on the face while masking a plywood, MDF, or particle core. Bookmatching and veneer repeats can look like attractive solid wood figure, but the thinness of the face and the presence of glue lines at the edge betray the construction. Edge shots, underside photos, and any exposed cuts are usually the quickest ways to reveal veneered or laminated construction.
When should I get an expert opinion instead of relying on photos?
If the material choice affects safety (stair treads, structural shelving), value (antique restoration), or a costly restoration plan, seek an expert opinion after you collect the recommended photo set. Photographs are excellent for preliminary analysis and for guiding a professional's remote assessment, but hands-on inspection, thickness measurements, and simple physical tests are often necessary to confirm high-stakes material decisions.