Walnut vs Mahogany: Color, Grain, Pores, and Finish Clues
Learn which walnut vs mahogany visual clues a photo can support, which details need follow-up, and the verification steps to take before you rely on an ID.
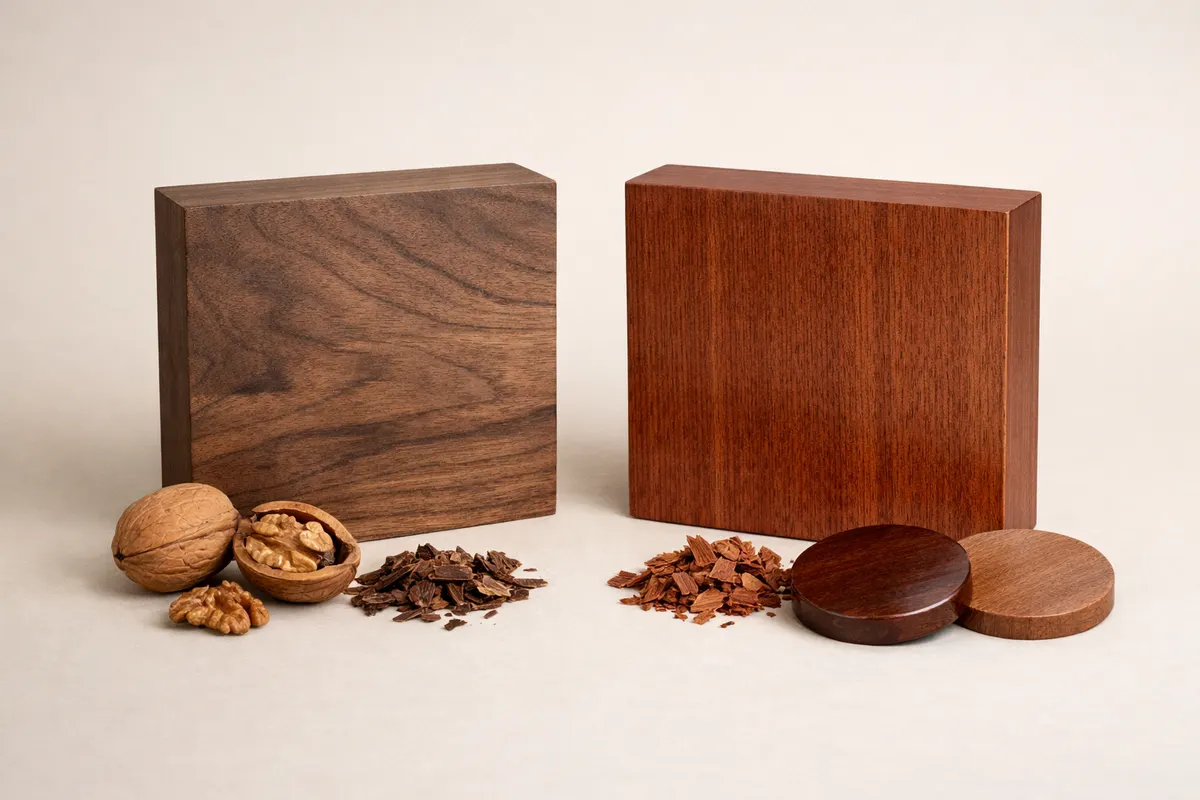
Quick answer: walnut vs mahogany at a glance
Walnut vs mahogany often look similar from a distance, but visible clues give reliable starting points. Walnut tends toward cooler brown tones with occasional purple or gray undertones and a straighter or wavy grain. Mahogany usually shows warmer, reddish-brown hues and a more uniform, interlocked or ribbon-like grain pattern. These color and grain tendencies provide quick visual direction, not certainty.
Pores and endgrain behavior are the next-most useful photo clues. Walnut (black walnut and related species) commonly shows medium-to-large open pores that appear as dotted rows on face grain and more obvious on endgrain. Genuine mahogany species (like Honduran mahogany) have finer, more evenly distributed pores and often display subtle ribbon figure in quartersawn faces. You can see these differences in close-up photos under good light.
Finish and age can hide natural color and grain. A dark walnut finish or a red-toned mahogany polish will shift what you expect to see. Treat finish as a modifier: note varnish color, surface sheen, and whether you can see pores through the finish. If only a single photo is available, list observed clues, rate your confidence low-to-medium, and plan the verification steps outlined later.
- Color: walnut = cool to neutral brown; mahogany = warm reddish-brown.
- Grain: walnut = straight, wavy, or curly; mahogany = interlocked, ribbony, smoother texture.
- Pores/endgrain: walnut = medium/large pores visible; mahogany = finer, more even pores.
- Finish effect: stains and varnishes can mimic the other species; look for pores showing through finish.
- Confidence: photos give useful hints but rarely a final ID alone—expect uncertainty.
Walnut vs mahogany: visible clues comparison
This table condenses the most helpful visual traits you can capture in photos. Use it to prioritize shots: overall board, close-up of face grain at an angle, extreme close-up of pores, and an endgrain face if possible. Each row notes how reliably the trait points to walnut or mahogany and what to watch for when the trait is altered by finish or repair.
Keep in mind that common furniture mixtures, veneers, and modern stains can replicate many listed traits. If the table points strongly but the object has heavy surface treatment or veneer seams, rely more on confirmation steps such as endgrain inspection or provenance checks.
| Trait | Typical Walnut | Typical Mahogany | Confidence & What to Photograph |
|---|---|---|---|
| Color (fresh / surface) | Cool to neutral medium brown; sometimes purple or gray undertone | Warm reddish-brown to deep red-brown tones | Medium; photograph under daylight and include an unshaded white balance card |
| Face grain pattern | Straight to wavy, often dramatic curls or burl figuring in decorative pieces | Interlocked or ribbon-like with consistent flow | Medium-high; shoot at low angle to show grain direction |
| Pores (surface & endgrain) | Medium to large pores visible in rows on face grain and distinct on endgrain | Finer, more even pores; rays less dramatic | High if you can get extreme close-up endgrain photos |
| Figure & rays | Can show strong curls and burls; rays less prominent | May show ribbon figure and subtle chatoyance, rays subdued | Medium; include both flatsawn and quartersawn faces if available |
| Finish effects | Dark stains can mimic mahogany; oils highlight grain | Red-toned finishes amplify warmth; shellac deepens red | Low; always note finish type and test a small unobtrusive scraped area when safe |
| Typical furniture use & age clues | Common in American furniture and gunstocks; often used for contrast veneers | Classic choice for high-end joinery, case furniture, and historic pieces | Contextual; include maker’s marks, joinery photos, and underside shots |
When walnut clues point stronger than mahogany (and vice versa)
Use walnut as the leading hypothesis when photographs show cooler brown tones, visible medium-to-large pores in close-up shots, and grain that can be straight, wavy, or strongly figured (curls, burl). Walnut is a common choice for furniture and visible veneers in North America; seeing repairs, tool marks, or the underside that match walnut’s color and pore pattern strengthens that reading.
Choose mahogany as the primary candidate when photos reveal a warm, reddish cast across multiple views, a smoother or ribboned grain flow, and finer pores on endgrain close-ups. Mahogany is often used in older, higher-end case furniture and musical instruments. If the piece displays consistent reddish hue through worn areas (not only surface finish), that supports mahogany over walnut.
Treat the decision as probabilistic. If a single trait points one direction but other clues contradict — for example, red tone with clearly large open pores — accept a mixed confidence rating and follow the verification path. Photographs of joinery, underside, labels, or provenance notes can move an ID from tentative to likely.
- Strong walnut indicators: cool brown tone, visible medium-large pores, curly figure or burl.
- Strong mahogany indicators: warm reddish tone visible through worn areas, ribbon grain, finer pores.
- Context clues that tip the scale: region of manufacture, known maker, typical period use.
- If finish conceals pores or color, prioritize endgrain, underside, or joint photos.
Common confusions between walnut and mahogany
Surface finishes are the leading cause of misidentification. A walnut board stained with a red-toned varnish will read as mahogany in casual photos, while mahogany coated with smoke-darkened oils can appear walnut-like. Photographs that don’t show the wood through worn or unfinished areas will over-weight finish color, so always look for chips, screw holes, or the underside where finish is thinner.
Veneers and thin decorative faces complicate visual comparison. Many antiques and mid-century pieces use walnut or mahogany veneers over other bodies. Veneer grain can be bookmatched or arranged to display dramatic figure that isn’t representative of the species throughout the piece. If seam lines, backing board, or plywood substrate is visible, label the piece as veneered rather than solid.
Lookalike species can also cause confusion. Other tropical or temperate woods (like certain cherry, sapele, or stained poplar) mimic the warm tone or grain pattern of mahogany or walnut. Sapele, for instance, often looks mahogany-like with interlocked grain, while stained maple or poplar may be passed off as walnut in cabinetry. Don’t rely on single-trait IDs when lookalikes are plausible.
- Stain and shellac can change perceived color dramatically—seek worn/unfinished spots.
- Veneer patterns can mislead; inspect edges, backs, and endgrain if possible.
- Sapele and some stained temperate woods are common mahogany/walnut lookalikes.
- Photographs alone are weakest when only one view or only finished surfaces are shown.
Verification path: steps to confirm walnut or mahogany
Start with targeted photos: a full-face shot in natural daylight, a low-angle close-up to show grain direction, an extreme close-up of pores on the face, and an endgrain view. If you can’t take endgrain photos, look for unfinished edges—drawer interiors, underside panels, or cutouts often reveal more honest wood. High-resolution images are essential for pore and figure inspection.
If photos leave doubt, use non-destructive cross-checks. Smell (fresh-cut wood has a distinct scent: walnut is mild-chocolatey or earthy; mahogany can be slightly sweet and spicy), weight (mahogany tends to be moderately dense), and how the wood takes a small scratch or light sanding—does a red or brown ground appear beneath the surface finish?—all contribute when you can examine the piece in person. Record these observations; they matter more than a single photograph.
When the identification affects money, restoration choices, or resale, take stronger verification steps. A thin, unobtrusive endgrain slice for magnified inspection, consulting a trusted furniture conservator, or checking maker marks and provenance records will reduce risk. If you plan to use an identification app as a first pass, treat its result as provisional and combine it with the physical checks above before acting.
- Photo checklist: full face (daylight), low-angle grain shot, extreme pore close-up, endgrain or bare edge.
- In-person checks: smell, small surface scrape to reveal ground color, density/weight feel.
- For high-stakes ID: consult a conservator, inspect joinery and maker’s marks, or arrange microscopic endgrain analysis.
- If using an app like Wood Identifier - Wudora, use the app’s result as a research note and follow up with physical verification before purchase or restoration.
Related guides
Next step: use Wood Identifier - Wudora as a research aid
After you collect the photos and notes above, try Wood Identifier - Wudora to get an initial, probabilistic reading that combines visual clues. Treat the app’s result as a research note—use its suggestions to prioritize which physical checks to run or which maker marks and provenance questions to pursue. Avoid relying solely on a single photo-based result for high-value or safety-sensitive decisions; confirm with endgrain inspection, joinery photos, and, if needed, a conservator.

Frequently asked questions
Can I reliably tell walnut from mahogany from one well-lit photo?
A single well-lit photo can provide strong hints but rarely a definitive answer. Color, grain flow, and visible pores in a single image can point toward walnut or mahogany, but finishes, stains, and veneers frequently mask species-level traits. For higher confidence, add a low-angle grain shot, an extreme close-up of pores, and an endgrain or bare-edge photo. If the decision affects value or restoration, use the photo as an initial note and follow the verification path to confirm.
How much does finish or stain affect visual identification?
Finish and stain can change perceived species dramatically. A walnut finished with a red-toned varnish will look mahogany-like in many photos, while a deeply stained mahogany can read as dark walnut. Look for worn areas, screw holes, drawer interiors, or the underside where finish is thinner. Those spots will show closer to the wood’s natural color and pore visibility. Always document finish type in your notes to avoid misreading surface color as species color.
Are endgrain photos required to tell walnut from mahogany?
Endgrain photos are one of the most reliable single-photo clues because they reveal pore size and arrangement, which differ between walnut and mahogany. Walnut generally shows more distinct, medium-to-large pores on endgrain, whereas mahogany’s pores are finer and more evenly distributed. When possible, include a clear endgrain shot with a scale (ruler) and strong side lighting to reveal pore patterns. If endgrain isn’t accessible, seek a bare edge or the underside for a comparable view.
When should I consult an expert instead of relying on photo clues?
Consult an expert when the identification will determine restoration materials, insurance valuations, or a significant purchase decision. Also seek professional help if the piece is veneered, heavily repaired, chemically treated, or shows conflicting clues across photos. Experts can perform microscopic endgrain analysis, solvent tests on finishes, or provenance research that go beyond photographic inspection. Use app results or photo-based IDs as preparatory information rather than the final authority when stakes are high.