Pine vs Cedar: Color, Smell, Grain, and Knot Clues
A practical comparison of pine vs cedar using color, smell, grain, and knot clues, plus what to confirm before you rely on a single photo-based ID.
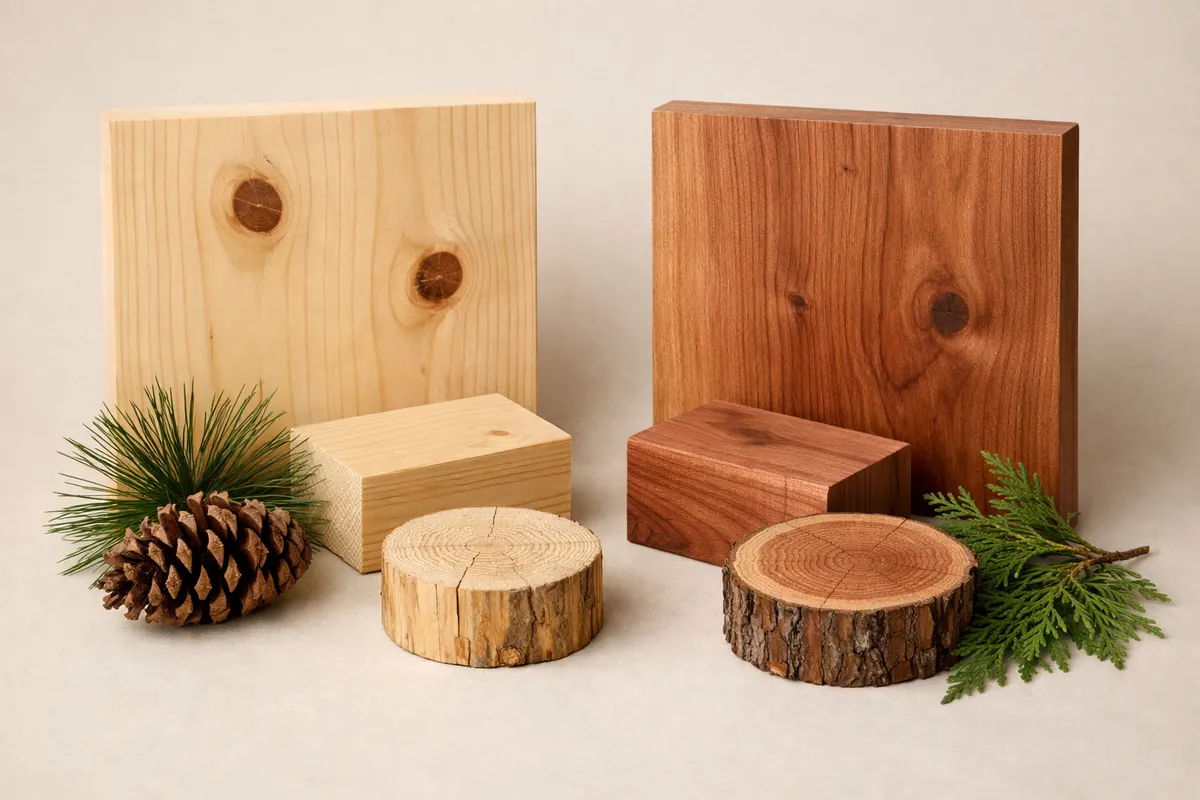
Short answer: how to spot pine vs cedar quickly
Pine vs cedar often look different once you know what to scan for: pine tends to be paler yellow to warm honey with larger, rounder knots and visible resin pockets; cedar usually shows redder to pinkish-brown tones, a straight, fine grain, and a distinct aromatic cedar scent when fresh-cut or warmed. Those are the fastest, photo-friendly clues photographers and DIYers can use right away.
In photos, color and knots are the most obvious indicators. Wide, prominent knots and softer, pale sapwood edges point toward pine species (especially common construction or knotty pine). Narrower, evenly spaced knots and a more consistently reddish hue favor cedar, particularly western red cedar or aromatic eastern red cedar (Juniperus virginiana), which can look similar in some light.
Smell is a strong non-photographic clue: cedar gives a persistent aromatic resin scent you can sometimes infer if the surface appears freshly cut or planed. Pine resin smells sweeter and can be visible as sticky droplets in close-up images. Grain texture also helps: pine typically shows more open, wider annual rings and more pronounced earlywood/latewood contrast, while cedar has a finer, more even texture.
Use these clues together rather than relying on one. A single photo under unusual light, heavy finish, or severe weathering can hide color and grain, so treat an ID from one image as a useful working hypothesis and follow the verification steps below before making decisions that affect value, safety, or authenticity.
- Color: pine looks pale yellow to warm honey; cedar leans pinkish, red-brown, or silvery when weathered.
- Knots: pine often has larger, darker knots; cedar knots are smaller and less frequent on clear grades.
- Grain: pine shows wider rings and stronger contrast; cedar has finer, straighter grain.
- Smell: cedar is aromatic and persistent; pine resin smells sweeter and may show sticky droplets.
- Photo caution: finishes, stains, sunlight, and weathering can disguise all of the above.
At-a-glance comparison: pine vs cedar clues
The table below summarizes the clues you can usually see in a photo and how certain each clue tends to be for pine vs cedar. Confidence is an estimate of how often that clue gives a reliable direction from a single clear photo; use higher-confidence clues first and confirm with other checks.
After the table, read the recommended next steps column. Even high-confidence clues benefit from quick follow-ups like checking end grain, smelling a freshly cut edge, or noting the wood's typical use and location (exterior siding, fencing, interior paneling).
| Feature | Typical pine | Typical cedar | Confidence from one photo | Quick next step |
|---|---|---|---|---|
| Color (fresh surface) | Pale yellow to warm honey | Pinkish-red to warm brown | Medium | Check sapwood contrast and look for reddish heartwood |
| Knots & resin | Large, round knots; visible resin pockets | Smaller, tighter knots; less sticky resin on surface | High | Zoom on knots and edges for resin droplets |
| Grain & ring contrast | Wider rings; strong earlywood/latewood bands | Finer, straighter grain; even texture | Medium | Compare ring spacing in a clear plank photo |
| Aroma (fresh cut or planed) | Sweet, resinous pine scent | Distinct, long-lasting cedar aroma | High (but not photo-detectable) | Smell a planed edge or recently cut end grain |
| Weathering behavior | Turns gray unevenly; knots stay darker | Develops even silvery patina on exposed faces | Low | Look for uniform gray patina vs patchy knot darkening |
When a surface is likely pine or cedar: quick scenarios
Think about where the wood is used and the finish. Knotty paneling, inexpensive construction lumber, furniture with large visible knots, and unfinished interior boards are often pine (common species: Eastern or Southern yellow pine, white pine). If you see big knot clusters and clear ring contrast in a plank photo, start with pine as your working ID.
Cedar is a top candidate for outdoor, insect-resistant, or aromatic uses. Look for siding, fence pickets, shingles, or closet linings—locations where cedar's rot resistance and scent are selected. Western red cedar and aromatic eastern cedar are frequent choices for exterior cladding and chests; a reddish tone plus straight, tight grain in a board from a fence or shingle strongly suggests cedar.
Some finishes change the decision. Varnish, oil, or stain can darken pale pine or bring out red tones, making pine appear cedar-like in photos. Conversely, heavy weathering or bleaching may turn cedar gray and remove its characteristic hue. When the usage context shows clear functional reasons—outdoor exposure, insect resistance—lean toward cedar; when the context is cheap interior build or visible resin, lean toward pine.
If you only have a single photo of an interior board and it has many large knots, visible sapwood edges, and appears soft with dent marks or tool grooves, pine is a more probable match. If the board is part of an exterior fence, shows a straight, tight grain and a pinkish cast, or you can detect an aromatic scent, cedar is the likelier option.
- Interior knotty boards, cheap furniture, or construction lumber = likely pine.
- Exterior fences, shingles, or closet linings with reddish tone = likely cedar.
- Smelled aroma or freshly planed face present = strong cedar signal.
- Large resin pockets or sticky droplets seen in photos = strong pine signal.
- If usage context is unknown, take end-grain photos and a close knot shot before deciding.
Why pine and cedar get mixed up (and what to check)
Several factors make pine vs cedar tricky in photos. Finishes and stains alter color dramatically: pine stained red can mimic cedar, while cedar bleached by sun and rain can resemble pale pine. Grain visibility depends on lighting and the board's orientation, so a photo that hides growth rings will reduce the reliability of ring-contrast clues.
Lookalike species cause confusion. Some softwoods—Douglas fir, spruce, and hemlock—can present ring patterns and knot sizes similar to pine or cedar depending on cut and grade. For example, dressed fir used in siding may have a warm tone and straight grain that resembles cedar at a glance; similarly, aged yellow pine can darken into orange-brown hues like some cedars.
Knot characteristics can be deceptive. Finished or painted knots lose contrast and size cues. Also, reclaimed lumber often includes multiple species; a board from a mixed pallet may have a pine face but a cedar end piece joined to it. Photos of joints, end grain, and tool marks help reveal mixed-source lumber.
Finally, species variation within each genus matters. 'Pine' covers many species with very different appearance: knotty southern yellow pine looks different from white pine or pitch pine. 'Cedar' may refer to true cedars (Cedrus) or regional cedars (like western red cedar and eastern red cedar/juniper). When possible, identify the likely species group by combining visible clues with context such as geography and intended use.
- Stain and varnish can make pine look cedar-like — check unfinished edges.
- Weathering can erase cedar’s red tones — inspect less-exposed faces.
- Douglas fir, spruce, and hemlock can be mistaken for either — seek end-grain.
- Reclaimed wood and mixed boards hide species changes — photograph joints.
- Regional naming (e.g., “cedar” used for different trees) adds ambiguity.
Verification path
Treat a single photo ID as preliminary. Confirm with a short verification checklist that combines a few low-effort physical checks and targeted photos. Start by photographing end grain, a close-up of a knot, and an unfinished edge. End-grain photos show ring spacing, pores (if present), and ray visibility—features that reduce species ambiguity more than face photos do.
Smell tests and feel tests are very useful. Smell a freshly cut or planed end: if the scent is a strong, persistent cedar aroma, that pushes the ID toward cedar; a sweet, resinous pine scent supports pine. Feel hardness and weight: cedar is generally lighter and softer than many pine species used in construction, but species variation and moisture content affect this, so use it with caution.
Record context: where the wood was used and its likely purpose. Exterior fence boards, shingles, or closet lining with a scent point to cedar. Construction framing, subflooring, cheap paneling, or furniture with many large knots more often indicate pine. When in doubt, consult a detailed visual checklist like the Wood Visual Checklist: Common Clues, Lookalikes, and Next Steps for more imaging tips and example photos (https://woodidentification.app/blog/wood-visual-checklist).
If you need high certainty — for sale listings, restoration work, or legal/appraisal purposes — combine visual checks with a specialist's opinion. A local lumberyard, experienced carpenter, or a lab test of microscopic anatomy can confirm species. For most homeowner or hobbyist needs, good photos plus the checks above give a defensible working identification.
- Photo set: wide shot, close-up of knot, close-up of end grain, and an unfinished edge.
- Smell: check a planed or freshly cut edge for aromatic cedar or sweet pine resin.
- Feel: note density, dent resistance, and how it sands—cedar often sands very smoothly.
- Context: note original use (fence, siding, paneling, furniture) and age/weathering.
- When high certainty matters, seek a specialist or microscopic analysis.
Related guides
Still unsure? Use Wood Identifier - Wudora as a next check
After you’ve checked color, knots, grain, end grain, and given the board a quick smell test, try Wood Identifier - Wudora as a first-pass research tool to compare your photos against common species. Treat the app’s suggestion as a helpful second opinion and keep your verification photos and notes handy. If your match matters for sale, restoration, or safety, use the app result alongside a hands-on check or a specialist consultation rather than as a final determination.

Frequently asked questions
Can I tell pine vs cedar from one photo?
You can often make a reasonable guess from one clear photo if the image shows natural color, knots, and grain close-up. However, finishes, lighting, and weathering frequently disguise those clues. Treat a single-photo result as a working hypothesis: gather an end-grain shot, an unfinished-edge photo, and a smell check to raise confidence before making decisions that affect value or safety.
Does cedar always smell strongly?
Many cedar types—especially eastern red cedar (Juniperus virginiana) and western red cedar—emit a noticeable aromatic scent when freshly cut or planed, but the smell fades with age and heavy finishes. If the wood smells only faintly or not at all, it could be old or finished cedar, or a different species entirely. Always combine scent with visual clues for better confidence.
How do knots differ between pine and cedar?
Pine commonly shows larger, rounder knots that stand out against paler sapwood and may be associated with visible resin; these knots can be numerous in knotty grades. Cedar knots are often smaller and tighter with less prominent resin; on clear grades of cedar you may see very few knots. Knot size and frequency are good visual clues but can be hidden by paint or heavy weathering.
When should I get a professional ID instead of guessing?
Get a professional identification when the species affects monetary value, legal or restoration accuracy, or safety (for example, identifying treated vs untreated structural lumber). If you must be certain for an appraisal, conservation project, selling high-value furniture, or compliance reasons, ask a local lumber expert, furniture restorer, or request microscopic analysis. For casual projects, follow the verification path above to reach a confident working ID.