Maple Wood Grain: Color, Figure, Pores, and Hardness Clues
Practical guidance for reading maple wood grain: which visual clues hold up in photos, common lookalikes, and how to compare multiple traits before concluding.
Quick answer: what maple wood grain usually shows
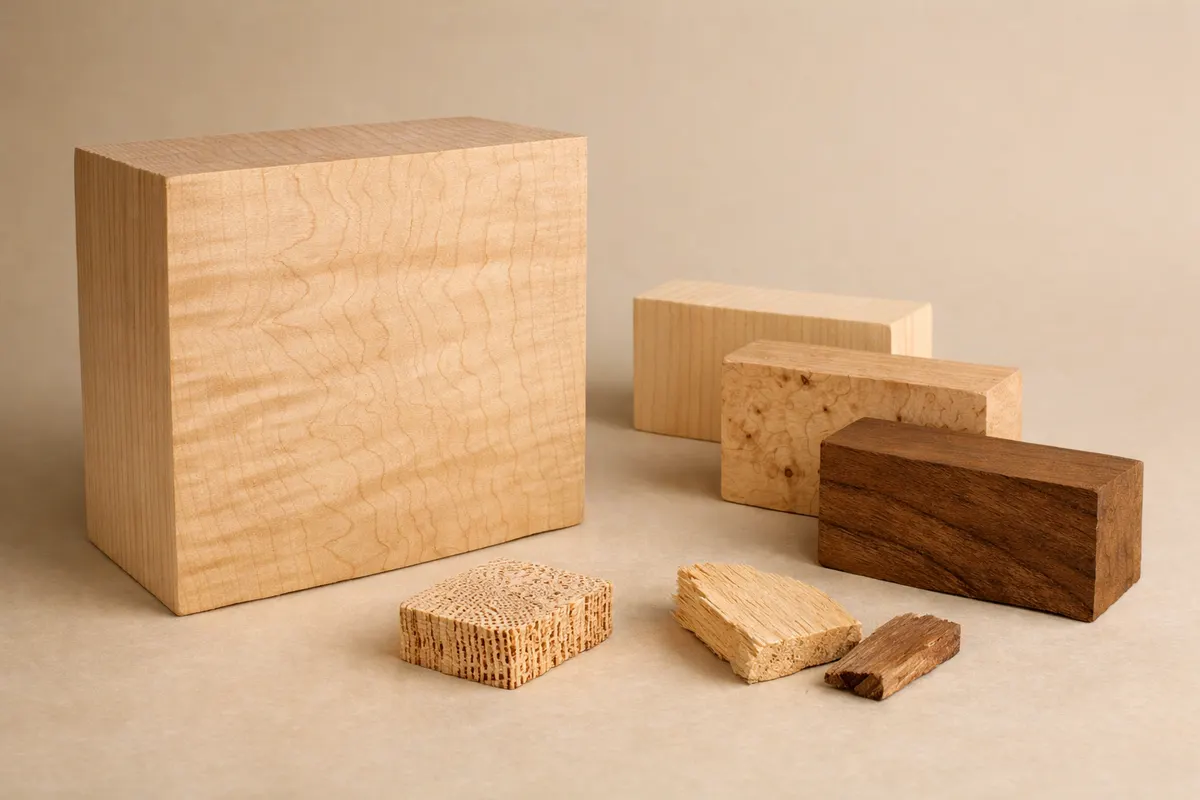
Maple wood grain most reliably shows a tight, generally smooth texture, light creamy to reddish tones, and figure patterns such as flame, birdseye, or curly in some varieties. When someone asks “is this maple?” a clear photo of the face grain, end grain, and a scale or coin for size gives the best initial evidence.
The strongest single clues you can expect from a photo are the overall pore pattern (maples are diffuse-porous or nearly non-porous), the grain’s fineness, and any distinctive figure like birdseye or curly. These features survive common photo issues — shadows, slight blur, and finish — more often than subtle color differences.
What a photo cannot prove is exact species, age, or region. For example, “hard maple” versus “soft maple” or sugar maple versus silver maple require density checks or growth-ring context beyond a single image. Treat photographic clues as directional: useful for narrowing options and deciding next checks, not for absolute identification.
- Reliable from a phone photo: diffuse-porous pore pattern, fine straight grain, and prominent figure (curly, birdseye, flame).
- Sometimes visible: light cream to pale brown color, subtle rays or shimmer from finish, and small, scattered mineral streaks in older boards.
- Not reliable from one photo: exact species (sugar vs silver), age, hardness, or whether the board has been bleached or stained.
Strong visual clues to check on maple wood grain
Start with pores and texture. Maples are diffuse-porous: pores (vessels) are about the same size throughout the growth ring or so small they’re nearly invisible in face grain photos. In plain-sawn maple the surface looks uniformly fine; quarter-sawn maple still lacks the large ring-porous pores you’d see in oak or ash. A single close-up (handheld macro or phone close focus) of an unpainted face will show whether the wood is diffuse-porous.
Look for characteristic figure. Several maple species produce distinctive figured patterns that are easy to spot in photos: curly or flame figure appears as wavy lines that catch light, birdseye shows many tiny swirling knots, and quilted or fiddleback patterns can appear as repeating bulges. These patterns are growth anomalies, not species guarantees, but their presence strongly points toward maple when paired with a diffuse-porous pore pattern.
Check grain tightness and general smoothness. Maple tends to have a very tight, even grain with a smooth hand-feel when sanded. Photos that include a hand or a familiar object for scale help readers appreciate how fine the grain is. Very open pores, long visible rays, or deep furrows point away from maple and toward ring-porous or softwoods.
Observe color and sapwood patterns as supporting clues. Most maples show pale sapwood that blends to a slightly darker heartwood; sugar maple often has creamy white heartwood while some soft maples can show pinkish or brownish tints. Color can be altered by finish, sun exposure, or staining, so treat it as supportive rather than decisive.
End grain is an underused but powerful check. A clear photo of the end grain at reasonable magnification will reveal pore distribution across a growth ring. Maple’s end grain shows many small, evenly distributed pores rather than large ring-porous bands. If you can take a cross-section photo, it’s one of the fastest ways to confirm diffuse porosity.
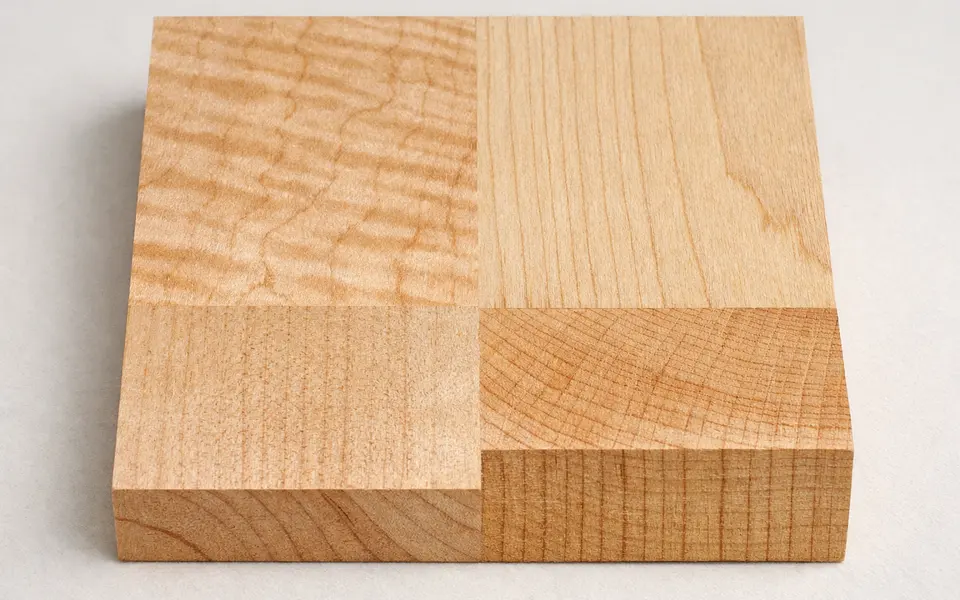
- Diffuse-porous appearance (pores uniform and small) — strong indicator of maple.
- Figure patterns (curly, birdseye, flame) — highly suggestive when paired with diffuse porosity.
- Tight, fine grain and smooth surface — supports a maple ID, especially for hardwood flooring and furniture.
- End-grain photos that show uniform, small pores — among the best single-photo checks.
Weak signals and common visual traps with maple grain
Color alone is a weak signal. Many woods range from pale to medium brown and finishes or age can shift tones dramatically. For example, pale beech, sycamore, or poplar can look maple-like in photos, and a clear finish will amplify grain figure differently across species. Avoid concluding maple solely because the board appears creamy or light.
Glare, finish, and sanding marks can create false figure. Wavy sanding or a glossy varnish will exaggerate a pattern that isn’t true figure; conversely, a dull, worn finish can hide a real curly or birdseye figure. When possible, take an additional photo with matte lighting or a polarized lens to reduce specular highlights.
Single-angle photos miss critical clues. A face-only photo doesn’t show pore distribution across a ring, and angle-dependent figure like flame can vanish from one vantage point. Capture multiple angles: face grain in good light, a close end-grain shot, and a low-angle shot to reveal chatoyance or flame.
Lookalikes that confuse maple: some poplars and lighter oaks (when quarter-sawn) can mimic maple in low-quality photos. Also, soft maple species can be confused with beech or aspen if pores aren’t visible. Use a checklist approach — pore pattern, figure, grain tightness — to separate true maple from lookalikes.
- Don’t rely on color—finish or age can mislead.
- Glare can create fake figure; vary lighting to confirm patterns.
- One photo is rarely enough—get face, end grain, and scale.
- Be cautious around poplar, beech, and some quarter-sawn boards that mimic maple.
How to compare likely matches using multiple clues
Use a stepwise workflow to turn visual clues into a short list of candidates: 1) start with porosity and grain fineness, 2) add figure and color as supporting traits, 3) check end grain and growth rings, and 4) consider context such as region, furniture type, or flooring grade. Treat each step as an eliminator rather than a confirmer: if a wood fails a strong clue (for example, it’s clearly ring-porous), remove maple from the list.
Example comparison: you have a pale board with subtle flame figure. First inspect pores — if they’re diffuse and small, maple remains likely. Next check end grain: uniform small pores confirm diffuse porosity. Then ask about hardness: does the board dent easily with a thumbnail? If no and figure is present, sugar maple or curly maple becomes more plausible than poplar or pine. If nails are old and wide, or rings are very pronounced, oak or ash should be considered instead.
Use size and context to refine matches. Furniture and instrument makers commonly use hard maple for durability and bright finish response; softer maples or poplar are more common in painted furniture. Flooring planks with tight growth rings and little sapwood are more likely to be sugar maple used for flooring. Regional knowledge helps: certain maples and lookalikes are more common in different continents and climates.
When comparing images, keep an annotated checklist with you: pores (diffuse vs ring), figure (curly/birdseye presence), grain tightness, end-grain pore distribution, and known context (age, finish, object type). This structured comparison converts photos into consistent notes and reduces the chance that a single attractive feature (like flame) dominates the ID.
- Step 1: Confirm diffuse porosity (keep maple as candidate).
- Step 2: Look for figure types that support maple (curly, birdseye).
- Step 3: Cross-check end grain for uniform pores.
- Step 4: Add contextual filters: use, region, and expected hardness.
How to use an app after you’ve checked visible maple clues
After you’ve taken the face, end-grain, and scale photos and run the comparison workflow, use an identification app as a structured first pass. The app can highlight likely species based on image patterns and point out features you might have missed — but treat its result as a research lead, not a final verdict. If the app suggests maple, confirm against your checklist: diffuse pores, figure, and grain tightness.
Collect metadata with the photos. When saving images on your phone or in the app, add notes about where the wood came from, its use (furniture, floor, millwork), and any tactile tests you performed (thumb-nail hardness, weight feel). This contextual data improves later comparisons and helps separate similar candidates like poplar and soft maple.
If the app gives multiple likely matches, revisit clues that differentiate them. For example, if the results list sugar maple and poplar, verify end grain porosity and check for birdseye or curly figure — poplar lacks those figures and typically shows wider, more diffuse growth rings. Use the app output to prioritize which physical checks to run next (hardness test, scent, or controlled sanding).
Keep a conservative note in your records when certainty is low. Label uncertain results as provisional and, where identification matters (restoration, resale, allergen concerns), follow up with a lab or a skilled local sawyer for verification. If you want another blog-style visual comparison, the site’s Cherry Wood Color guide offers an example of how similar-looking hardwoods can be distinguished by combined clues: https://woodidentification.app/blog/cherry-wood-color.
- Use the app as a prioritized checklist, not proof.
- Attach context notes (origin, use, tactile tests) to photos.
- Re-test distinguishing clues when the app returns close matches.
- Mark uncertain IDs as provisional and pursue lab or expert checks when needed.
Related guides
Try Wood Identifier - Wudora as your next step
After you’ve photographed face grain, end grain, and noted context, run those photos through Wood Identifier - Wudora as a structured first pass. Use the app’s suggestions to prioritize which physical checks to do next, and mark any uncertain results as provisional research notes. Visit https://woodidentification.app/ to get started and learn how the app complements visual clues without replacing careful verification.

Frequently asked questions
Can I identify maple just by color in a photo?
No. Color alone is unreliable because finishes, sunlight exposure, and aging change appearance. Use color as a supporting clue only after checking pore pattern, grain tightness, and any figure. If the photo shows creamy tones plus diffuse porosity and fine grain, color supports a maple ID but does not confirm it by itself.
What photo angles help confirm maple wood grain?
Take at least three images: a close face-grain shot to show texture and figure, a close end-grain shot to reveal pore distribution across growth rings, and a scale shot with a coin or ruler for grain size. Add a low-angle, oblique photo to reveal chatoyance or flame. Multiple angles expose clues that a single photo can hide.
How do birdseye and curly figure affect identification?
Birdseye and curly are growth anomalies often associated with maple species; their presence strongly suggests a maple when combined with diffuse porosity and tight grain. However, figure can be produced by other species or enhanced by finishing, so always confirm with pore distribution and end-grain photos before concluding.
When should I seek lab or expert verification instead of relying on photos?
Seek lab or expert checks when the identification affects value, safety, or compliance — for example, antiques appraisal, conservation work, or legal restrictions. Also get verification if you can’t distinguish between lookalikes (poplar, beech, soft maple) after multiple photos and tactile checks. Treat app and photo-based IDs as preliminary until an expert confirms.